
Bird netting installation is one of the most effective and humane ways to exclude feral pigeons, starlings and sparrows from Australian buildings, and it is a service that adds real value to a pest management business. This guide covers why bird proofing matters, how bird behaviour shapes the job, and the basic procedures for cutting, joining, fastening and supporting a net so the finished installation has no gaps, wrinkles or sag.
The pest bird problem in Australia
Urban bird populations have grown markedly, adding to the long-standing problem of feral pigeons in and around public and retail buildings, houses and offices, warehouses and factories, bridges and monuments, sports and entertainment venues and transport hubs. Common starlings, once a serious problem, have declined over the last 30 years but still cause trouble in some situations. House sparrows and other small birds create particular difficulties for food manufacturers, processors and retailers because they can get through very small openings.
Feral pigeons, starlings and house sparrows are introduced species in Australia. Most native birds, including silver gulls, are protected under state and territory wildlife legislation, which is one reason exclusion by netting, rather than lethal control, is the preferred approach on most sites.
Why bird management matters
- Health: birds, their nests, feathers and droppings harbour fungal and bacterial diseases, allergens, protozoan parasites, insects and mites that are harmful to people.
- Image and amenity: bird fouling looks and smells unpleasant and deters people from using areas near roosting and perching sites.
- Slip hazards: droppings on pavements and walkways are a serious slip risk, and they build up again quickly after cleaning.
- Aggression: gulls in coastal towns are known to snatch food from people and can be aggressive towards people and pets, especially with young in the nest.
- Building damage: acidic droppings corrode stone and metalwork, and nesting material and droppings block gutters and downpipes, causing water damage.
- Cost: lost business, building repairs and the risk of health-and-safety prosecution are usually what triggers a bird management job.
Understand the birds before you proof the building
Physically protecting a structure from perching, roosting and nesting only succeeds when it is based on a good understanding of how the particular birds are using the site.
The big advantages of physical proofing are that it is humane and that it lasts. Because the birds remain alive, however, they will try to defeat the proofing or simply move to the next available spot on the same building. A solution that works for one species will not necessarily suit another: large, robust gulls need a fundamentally different approach to agile, persistent pigeons, which in turn need different treatment from small, manoeuvrable sparrows. The type and extent of proofing also depends on the pressure the birds are exerting, which depends on exactly how they are using the location, whether it is a casual daytime perch, an overnight roost or a nesting site.
Garrards runs a Certified Bird Course that trains and certifies pest managers to carry out bird netting installations.
Basic netting installation explained
The following procedures cover the steps most netting installations require. They are not exhaustive; there are many ways to install bird netting, but the goal is always the same: no gaps, openings, wrinkles or excessive sag in the finished net. Every installation is different and some of these guidelines may not apply to your site. If you have questions, contact Garrards.
Before you start, you must know
- The type of bird netting you will be installing.
- The netting hardware you will be using.
- If you are using a tensioned cable system, the cables must be installed and ready to receive the net.
- If you are using poly hardware, how each piece of hardware is installed.
Step 1: Cut the net to size
Garrards can supply nets pre-cut to size when you order. If you are cutting on site, double-check your dimensions first. Allow extra netting for perimeter fastening and for overlap seams (a minimum of 150 mm for each), and always leave the piece larger than you think you need.
Step 2: Join nets at overlap seams
Overlap adjoining pieces of net by at least 150 mm. Seal the seam with stainless steel net rings, installed every 150 mm along both sides of the seam for its full length, following the spacing you were taught on the Bird Course.
Step 3: Perimeter fastening
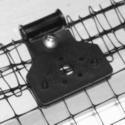
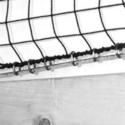
Use net rings to fasten the net to the perimeter cables. Multi-purpose clips can also be used with the cables if preferred. The perimeter is where most gaps occur, so keep ring spacing consistent right around the edge.
Step 4: Interior support
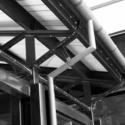
Overhead supports: use existing overhead pipes, beams, trusses and similar structure to support the interior of the net, away from the perimeter. Fasten to overhead supports as often as possible using net ties, poly cord or Net Savers.
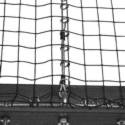
Support cables: use these where there is little overhead structure. Bird netting should never run more than about 15 metres without a support cable, and we recommend a support cable roughly every 7.5 metres. For K-Net, fasten the net to the cable with net rings; for PollyNet, use the poly hardware supplied for that system.
Step 5: Fitting around obstructions
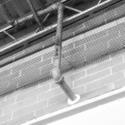
Objects hanging below the net (such as lights): do not cut large pieces out of the net. Make a simple slit or X cut just big enough for the object. If the obstruction is near an outside edge, make a straight cut from the edge to the obstruction; if it is in the middle of the area, cut the slit or X directly below the object. Pass the object through the mesh and seal the net back together above or behind it with seam hardware.
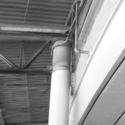
Square or rectangular objects on the perimeter (a column): cut a T in the net the same width and depth as the column, and use the excess netting from the T to fasten to the perimeter hardware. The perimeter hardware must follow the shape and direction of the outside edges.
Round objects on or near the perimeter (a large pipe): cut an X large enough for the pipe’s diameter, then a slit from the X to the nearest edge of the net. Use the excess netting from the X to fasten to the perimeter hardware, which again must follow the outside edges.
Safety
Bird netting is almost always work at heights, often on ladders, elevated work platforms or roofs, and often in areas contaminated with droppings. Follow the work-at-heights requirements of your state or territory WHS regulator, use appropriate fall protection, and wear respiratory protection, gloves and eye protection when cleaning droppings and nesting material before the net goes up. Check whether a state licence or permit is required for the bird work you are undertaking, particularly if any native species are present.
Frequently asked questions
How much extra netting should I allow?
At least 150 mm for perimeter fastening and at least 150 mm for each overlap seam. Always cut the piece larger than the finished size.
How far apart should support cables be?
Roughly every 7.5 metres, and never more than about 15 metres between supports.
Can Garrards pre-cut my nets?
Yes. Nets can be pre-cut to size when you order, which reduces waste and time on site.
Available from Garrards
Garrards supplies bird netting, stainless steel net rings, multi-purpose clips, net ties, poly cord, Net Savers, cable and the associated hardware, and runs the Certified Bird Course for pest managers who want to add bird proofing to their business.
Contact your local Garrards branch
Frequently asked questions
How much extra netting should I allow?
At least 150 mm for perimeter fastening and at least 150 mm for each overlap seam. Always cut the piece larger than the finished size.
How far apart should support cables be?
Roughly every 7.5 metres, and never more than about 15 metres between supports.
Can Garrards pre-cut my nets?
Yes. Nets can be pre-cut to size when you order, which reduces waste and time on site.